
Finned heating pipe: installation in systems
2026-10-05
Key stages of installation of finned pipes in heating systems
Installation of a finned heating pipe is a critical stage that determines up to 40% of the final energy efficiency of the entire system. In our practice, we have repeatedly encountered situations where expensive equipment failed not due to defective metal, but due to errors in the installation of heat exchange elements. Incorrect tightening of flanges or ignoring temperature gaps leads to depressurization of the circuit already in the first heating season. This article is a technical guide based on real experience in implementing systems in industrial workshops and residential complexes in Russia and the CIS countries. We'll walk you through the specific steps, necessary tools, and hidden risks that even experienced installers often overlook.
Finned heating pipes require a special approach to assembly due to the complex surface geometry. The increased heat transfer area achieved through spiral or plate fins creates specific loads on the fastening units. Whether you are planning to upgrade an existing system or build a new boiler room, understanding the physics of the installation process will help you avoid downtime. Below are detailed instructions, tested on dozens of objects of varying power.
Preparatory stage: system audit and selection of components
The start of work should always be preceded by a thorough analysis of the design documentation and the actual condition of the pipeline. A mistake at this stage is the most costly: an incorrectly selected type of fin or material of fins (plates) can lead to corrosion or insufficient heat transfer. In our practice, there was a case when a client purchased a batch of aluminum finned pipes for a system with an aggressive coolant, which led to the destruction of the fins after 6 months of operation. Always check the chemical composition of the coolant with the product data sheet.
Before installing a finned heating pipe, you must ensure that all certificates of conformity are available. For the market of the Russian Federation and the EAEU, it is mandatory to have an EAC (Eurasian Conformity) certificate confirming the safety of products. It is also worth requesting hydraulic test reports from the manufacturer. The absence of these documents not only violates the law, but also jeopardizes the warranty on all equipment. Check the markings on each pipe: it should contain the diameter, fin pitch, base material and production date.
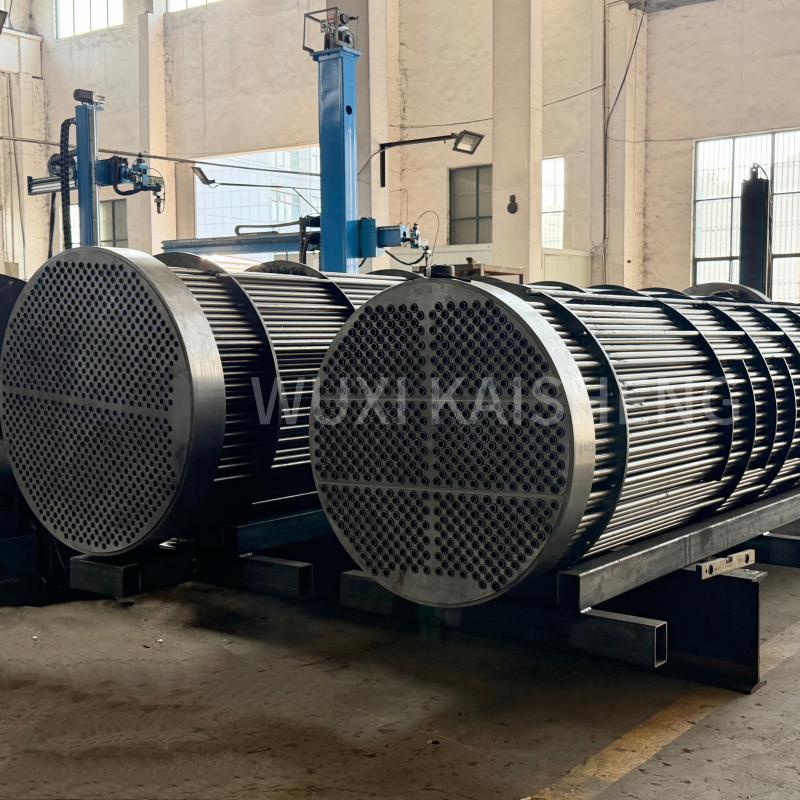
Choosing a reliable supplier plays a decisive role even before installation work begins. For example, a companyWuxi Kaisheng Electric Power and Petrochemical Equipment Co., Ltd.specializes in the design and manufacture of high quality heat transfer equipment, including corrugated tube bundles made from 316 stainless steel, C46400 marine brass, copper-nickel alloys and titanium. Their products, certified to international ASME and PED standards, are highly corrosion resistant and resistant to extreme pressures and temperatures. The use of proven components such as 321 steel or alloy C70600 tube sheets initially minimizes metal quality risks, allowing installers to focus solely on the manufacturing accuracy of the assembly. This is especially important for projects in the oil refining, chemical industry and energy conservation, where reliability requirements are extremely high.
An inventory of tools must be carried out in advance. You will need not only standard wrenches, but also a specialized torque tool to control the tightening force. The use of an “eye gauge” when working with flange connections of finned pipes is unacceptable. Over-tightening deforms the sealing gaskets, and under-tightening leads to leaks under high pressure. Also prepare a thermal imager for subsequent diagnostics of heating uniformity.
- Required tool:A set of open-end and socket wrenches, a torque wrench (range 20–150 Nm), a pipe bender (for soft metals), an apparatus for ultrasonic flaw detection (optional, for critical components).
- Consumables:Paronite or graphite gaskets (depending on ambient temperature), high-temperature thread lubricant, antifreeze-resistant sealant (if used).
- Protective equipment:Heat-resistant gloves, safety glasses, fire-resistant protective clothing.
Make sure the pipe storage area is dry and heated before installation. Sudden temperature changes can cause condensation on the metal surface, which will start the oxidation process before assembly begins. If the pipes were stored outside during the winter, they must be kept in a warm room for at least 24 hours before installation. This simple rule prevents the appearance of microcracks in the weld area during the first warm-up of the system.
Technology for installing finned tubes: step-by-step algorithm
The process of installing finned heating pipes in systems requires strict adherence to the sequence of operations. Any deviation from the technology can reduce the efficiency of the heat exchanger by 15–20%. Below is a detailed algorithm of actions developed on the basis of GOST standards and recommendations of leading manufacturers of heat exchange equipment.
- Marking and preparing seats.
The first step is to accurately mark the mounting points for the supports and brackets. The distance between supports for finned pipes should be less than for smooth pipes of the same diameter, due to the increased windage of the structure and uneven mass distribution. The support spacing is calculated based on the diameter of the pipe and the weight of the coolant; it is usually 1.5–2.5 meters for horizontal sections. Use a laser level to ensure a perfect horizontal level: even a slight slope can create air pockets at the top of the system, blocking circulation. Clean the ends of the pipes from factory preservative grease and contaminants using a non-chlorine solvent so as not to damage the protective coating of aluminum or steel.
- Cutting and finishing of ends.
If it is necessary to adjust the length of pipes, use only a mechanical cutting method (pipe cutter or metal hacksaw with a fine tooth). The use of gas cutting or a grinder with an abrasive disc is strictly prohibited, since the high temperature of local heating changes the crystalline structure of the metal in the cutting area, making it brittle. After cutting, be sure to chamfer at an angle of 30–45 degrees. Burrs on the inner diameter of the pipe create flow turbulence, increase hydraulic resistance and promote the accumulation of sludge. After treatment, it is recommended to blow the inner surface with compressed air to remove metal shavings.
- Assembly of flange connections.
This is the most critical stage of installing a finned heating pipe. Install the gasket onto the flange, making sure it is centered in the bolt holes. Lubricate the bolt threads with high-temperature lubricant - this will ensure uniform tightening force and allow the assembly to be easily removed in the future. Tighten the bolts crosswise in three stages: first, pre-tighten by hand, then 30% of the rated torque with a torque wrench, and finally, 100% of the torque. Violation of the tightening order leads to distortion of the flange and extrusion of the gasket. Control the gap between the flanges: it should be the same around the entire perimeter with an accuracy of 0.1 mm.
- Installation of compensators and supports.
Finned tubes are subject to significant linear expansion when heated. The coefficient of thermal expansion depends on the base material (steel or copper), but on average it is 1.2 mm per meter of length when heated to 100°C. Ignoring this factor leads to destruction of welds or deformation of heat exchanger housings. Install U-shaped or lens compensators every 10–15 meters of a straight section. The sliding supports should allow the pipe to move freely along the axis, so do not weld them tightly, but use clamps with a Teflon gasket. Rigid fastening of long sections is one of the most common causes of accidents in the first years of operation.
- Hydraulic tests and pressure testing.
After assembly is completed, the system must pass a leak-tightness and strength test. The test pressure must exceed the working pressure by 1.5 times, but not exceed the yield strength of the material. For heating systems, a pressure of 1.0–1.5 MPa is usually used. Fill the system with water slowly, removing air through automatic air vents installed at the highest points. Pressurize the system for at least 24 hours. A pressure drop of more than 0.02 MPa indicates a leak. A visual inspection of all joints is mandatory: even a microdrop of water at the joint of the flanges will eventually turn into a serious accident. Only after successful crimping can you begin thermal insulation.
It is important to note one nuance that is rarely written about in instructions. When installing finned pipes in systems with forced circulation, the direction of coolant flow must coincide with the direction of winding of the fins (if it is spiral). Although modern resistance welding techniques provide high strength, the oncoming flow can create vibration in the fins, leading to fatigue failure after a few years. Always check with the manufacturer for fin orientation when ordering.
Typical installation errors and methods for preventing them
An analysis of service reports over the past 5 years shows that 70% of problems with finned tubes are due to human error during installation. Knowing these mistakes will allow you to avoid costly repairs. Let's look at the most common situations we encountered at sites.
Mistake #1: Ignoring the cleanliness of the intercostal space.
Installers often use pipes with damaged or stuck together fins, believing that “they will unravel under pressure.” This is a misconception. If the ribs are deformed during transportation or storage, it is impossible to restore their original geometry without damaging the contact with the base. Air pockets between the stuck together fins act as heat insulators, reducing the heat transfer efficiency in this area to zero. Before installation, each linear meter of pipe must be inspected. Deformed areas should either be straightened with a special comb (with caution) or replaced. In our practice, there was a case when a customer saved on replacing a batch of pipes with crushed fins, which led to underheating of the room by 8°C and excess gas consumption by 35% during the winter.
Mistake #2: Wrong choice of gasket material.
The use of rubber gaskets in high-temperature circuits (>110°C) is a gross violation. Rubber quickly hardens, loses elasticity and cracks, causing leaks. For heating systems with finned pipes, it is necessary to use paronite, graphite or combined materials with metal braid. In addition, silicone-based sealants cannot be used to seal high-pressure flanges - they are washed out by the coolant flow. Always follow the pipe manufacturer's recommendations for seal type. Saving on a penny gasket can lead to flooding of the boiler room and a shutdown of production.
Mistake #3: Lack of deaeration.
Oxygen dissolved in the coolant is the main enemy of steel finned pipes. It causes intense oxygen corrosion, especially at welds and dissimilar metal contacts (for example, steel pipe and aluminum fin). If the system is open or not equipped with high-quality deaerators, the service life of the pipes is reduced by 3–4 times. We recommend installing membrane expansion tanks with automatic make-up valves and chemical treatment of water with corrosion inhibitors. Regular monitoring of the pH of the environment (optimally 8.5–9.5) is mandatory for long service life of the equipment.
| Comparison parameter | Correct installation | Common mistake | Consequences |
|---|---|---|---|
| Flange tightening | Using a torque wrench, criss-cross, in 3 steps | Pneumatic tools “all the way”, chaotic order | Flange distortion, gasket extrusion, leakage |
| Expansion compensation | Installation of U-shaped expansion joints every 10–15 m | Rigid fixation of the pipe along its entire length | Rupture of welds, deformation of the heat exchanger housing |
| Gasket material | Paronite, graphite, metal-graphite | Technical rubber, silicone | Gasket failure at T > 100°C, emergency pressure release |
| Surface preparation | Cleaning grease, checking fin geometry | Installation “as is”, ignoring contamination | Efficiency reduction by 20–40%, local overheating |
Specifics of integration into various types of heating systems
There is no universal installation recipe. Operating conditions in a private home and in an industrial workshop are radically different. Adaptation of technology to a specific object is a sign of the performer’s professionalism.
Industrial high pressure systems.
Pressures up to 2.5 MPa and temperatures up to 150°C operate here. The main requirement is maximum connection reliability. We recommend using butt welding with X-ray or ultrasonic inspection of the weld instead of flanged joints where possible to minimize the number of potential leak points. Finned tubes in such systems often have a bimetallic structure (steel base, aluminum fins). It is critical to avoid galvanic coupling in the presence of an electrolyte. If the water in the system is not ideally prepared, contact between steel and aluminum will quickly destroy the less noble metal. In such cases, it is necessary to apply a dielectric coating to the transition zones or use special insulating sleeves.
Low temperature heating systems (warm floors, convectors).
In these systems, the coolant temperature rarely exceeds 60°C, but the requirements for hydraulic balance are higher. Finned tubes are often used here as part of convectors or registers. The main task is to ensure laminar flow and uniform heating. Installation must exclude any narrowing of the cross-section that creates noise. Particular attention is paid to air removal: in low-temperature systems, natural convection is weak, and air pockets can completely block circulation in individual branches. Automatic air vents must be installed at each pipeline rise.
Aggressive environments and specific conditions.
In some industries (chemical industry, agriculture with high humidity and ammonia), the atmosphere around pipes is aggressive. Standard aluminum fins can corrode on the outside. In such cases, installation of finned heating pipes with polymer coating of the fins or the use of stainless steel is used. The installation technology becomes more complicated: you cannot scratch the protective coating with a tool. All grips and supports must have soft pads. Damage to the outer layer negates the corrosion protection. We recommend an annual visual inspection of the external condition of the fins in such conditions.
Economic justification for high-quality installation
Clients often ask why spend additional time and money on strict adherence to technology if “it works that way.” The answer lies in long-term economics. High-quality installation of finned pipes increases the service life of the system from 7–10 years to 20–25 years. A reduction in thermal efficiency of just 10% due to installation errors results in thousands of dollars in wasted energy annually. For a 5,000 sq. ft. property, this could add up to $15,000 per year in additional gas or electricity costs.
In addition, the cost of emergency repairs during the heating season is many times higher than the cost of preventive work in the summer. Downtime due to defrosting pipes or stopping the boiler room can cost the company millions of rubles in losses. Investment in qualified installation and high-quality components pays off in the first 2–3 years of operation due to energy savings and lack of repairs.
Quality control and commissioning
The final stage is testing the system’s performance in real conditions. Don't limit yourself to cold water hydraulic testing. Thermal testing reveals problems not visible in a cold test.
Используйте тепловизор для сканирования всей протяженности оребренных труб. Равномерность цвета на экране прибора говорит о правильном контакте ребер с основой и отсутствии воздушных пробок внутри труб. Холодные пятна указывают на засоры или завоздушивание. Горячие точки могут сигнализировать о локальном перегреве из-за нарушения циркуляции. Составьте термограмму объекта и сохраните её как базовый документ для будущего сравнения.
Проведите балансировку системы. Отрегулируйте расходомеры на ветках так, чтобы температура обратки была одинаковой во всех контурах (с допуском ±2°C). Дисбаланс приводит к тому, что часть помещений перегревается, а часть остается холодной, при этом котел работает в неэффективном режиме. Настройка занимает несколько часов, но дает ощутимый эффект комфорта и экономии.
Документирование выполненных работ — обязательный шаг. Составьте исполнительную схему с указанием мест установки компенсаторов, опор, запорной арматуры и приборов учета. Внесите данные о сериях и номерах установленных труб, датах испытаний и использованных материалах в паспорт объекта. Это облегчит будущую диагностику и ремонт.
Frequently Asked Questions
Какой минимальный шаг опор требуется для оребренных труб диаметром 57 мм?
Для труб диаметром 57 мм с оребрением рекомендуемый шаг опор составляет не более 2.0 метров для горизонтальных участков и 3.0 метров для вертикальных. Однако точное значение зависит от плотности оребрения и веса теплоносителя. В нашей практике мы сталкивались со случаями прогиба труб при шаге 2.5 метра в системах с плотным оребрением, поэтому мы советуем придерживаться значения 1.5–1.8 метра для гарантии жесткости. Всегда рассчитывайте нагрузку индивидуально, учитывая вес воды внутри трубы.
Можно ли сваривать оребренные трубы непосредственно в зоне оребрения?
Нет, сварка в зоне оребрения категорически запрещена. Высокая температура сварочной дуги уничтожит термический контакт между ребром и трубой на расстоянии до 50 мм от шва, превратив этот участок в неэффективный. Кроме того, возможны ожоги и деформация тонких ребер. Сварные стыки должны выполняться только на гладких концах трубы (патрубках), предварительно очищенных от оребрения на длину, необходимую для разделки кромок. Если труба поставляется без гладких концов, оребрение необходимо аккуратно удалить механическим способом перед сваркой.
Как часто нужно проводить очистку межреберного пространства?
Периодичность очистки зависит от запыленности помещения. В чистых жилых помещениях достаточно визуального осмотра раз в 3–5 лет. В промышленных цехах с высокой запыленностью (деревообработка, текстиль, зернохранилища) очистка требуется ежегодно, а иногда и чаще. Забитые пылью ребра работают как “шуба”, резко снижая теплоотдачу. Для очистки используйте сжатый воздух или мягкие щетки. Применение воды под давлением возможно только если система отключена и просушена, иначе влага вызовет коррозию. Мы рекомендуем устанавливать защитные кожухи на нижние участки труб в грязных производствах.
Conclusion and recommendations for choosing a supplier
Монтаж оребренной трубы отопления — это сложный инженерный процесс, требующий высокой квалификации исполнителей и строгого соблюдения технологий. От качества выполнения этих работ напрямую зависят энергоэффективность здания, комфорт людей и безопасность эксплуатации. Ошибки, допущенные на этапе установки, практически невозможно исправить без полной переборки системы, что ведет к колоссальным убыткам.
Выбирая оборудование, обращайте внимание не только на цену за метр, но и на репутацию производителя, наличие сертификатов EAC, ASME или PED, а также на качество геометрических параметров оребрения. Дешевые трубы с неравномерным шагом ребер или плохим контактом слоев сэкономят вам бюджет сейчас, но создадут проблемы на десятилетия вперед. Наша компания специализируется на поставках сертифицированных оребренных труб, прошедших многоступенчатый контроль качества, и готова предоставить техническую поддержку на всех этапах проекта — от проектирования до шеф-монтажа.
Мы понимаем, что каждый проект уникален. Если у вас возникли вопросы по подбору типа оребрения, расчету компенсации теплового расширения или необходимости адаптации стандартных решений под ваши условия, наши инженеры готовы провести бесплатный аудит вашей задачи. Правильный старт — залог надежной работы системы на протяжении 20 лет.
Не рискуйте безопасностью и эффективностью вашего объекта. Доверьте монтаж оребренных труб профессионалам с подтвержденным опытом.Contact us todayдля получения консультации и расчета стоимости оборудования с учетом логистики до вашего региона. Мы поможем подобрать оптимальное решение, которое сэкономит ваши деньги на энергоносителях уже в первую зиму.
Для получения дополнительной информации о технических характеристиках наших труб и условиях поставки посетите разделкаталог оребренных труб, где представлены подробные спецификации и примеры реализованных проектов.